Your development team quotes 2-3 weeks to build an A/B test variant. Your designer needs another week for mockups. By the time the test launches, you've missed the holiday season—and the opportunity.
This timeline problem isn't just frustrating. It's expensive. Every week you wait to test a hypothesis is a week of lost potential revenue. Every iteration that takes weeks instead of hours means fewer experiments, slower learning, and competitive disadvantage.
Here's what the traditional CRO timeline looks like:
What if you could run that same experiment in 60 minutes?
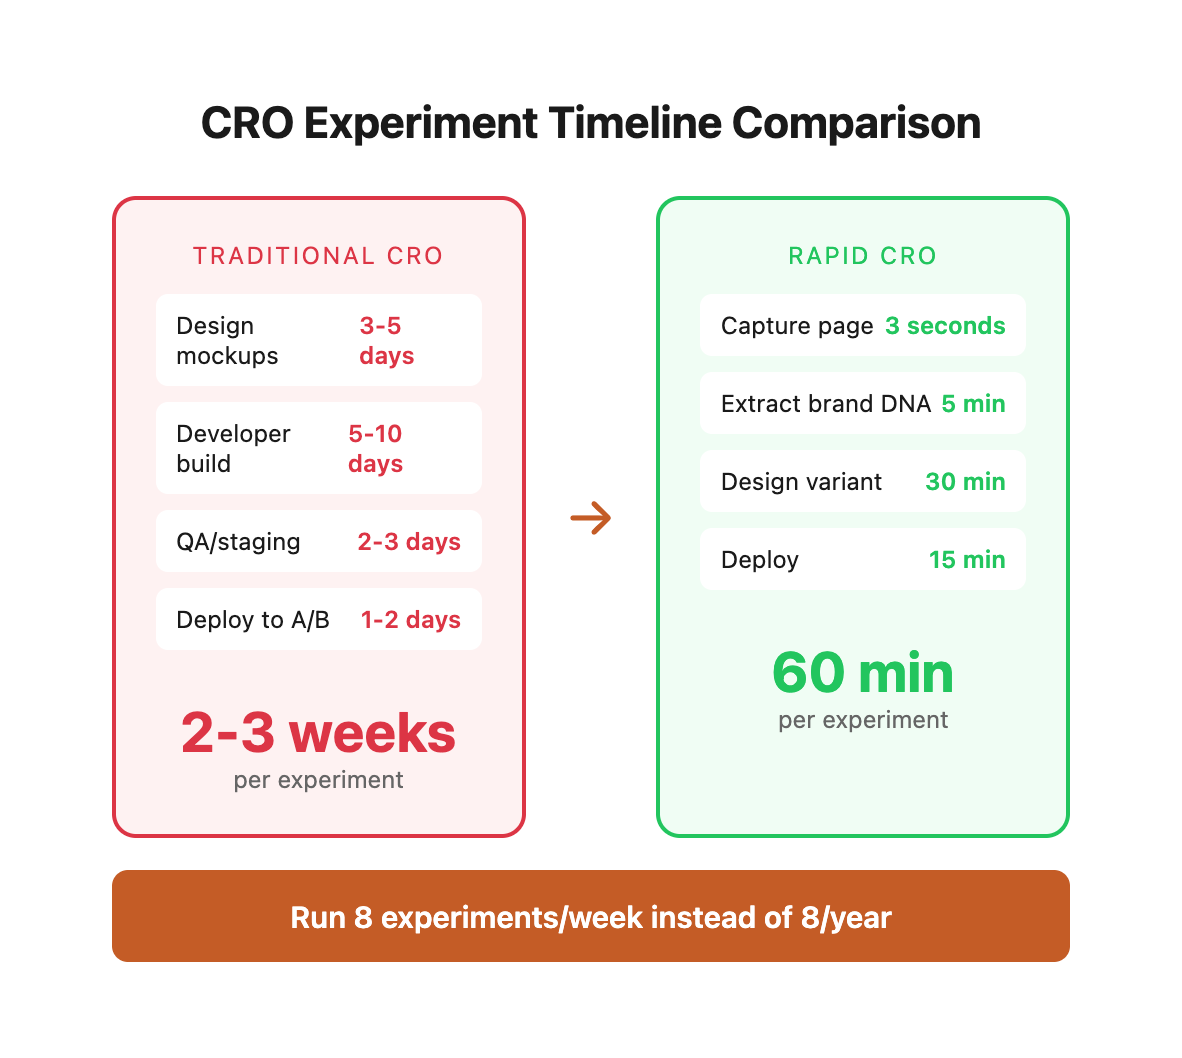
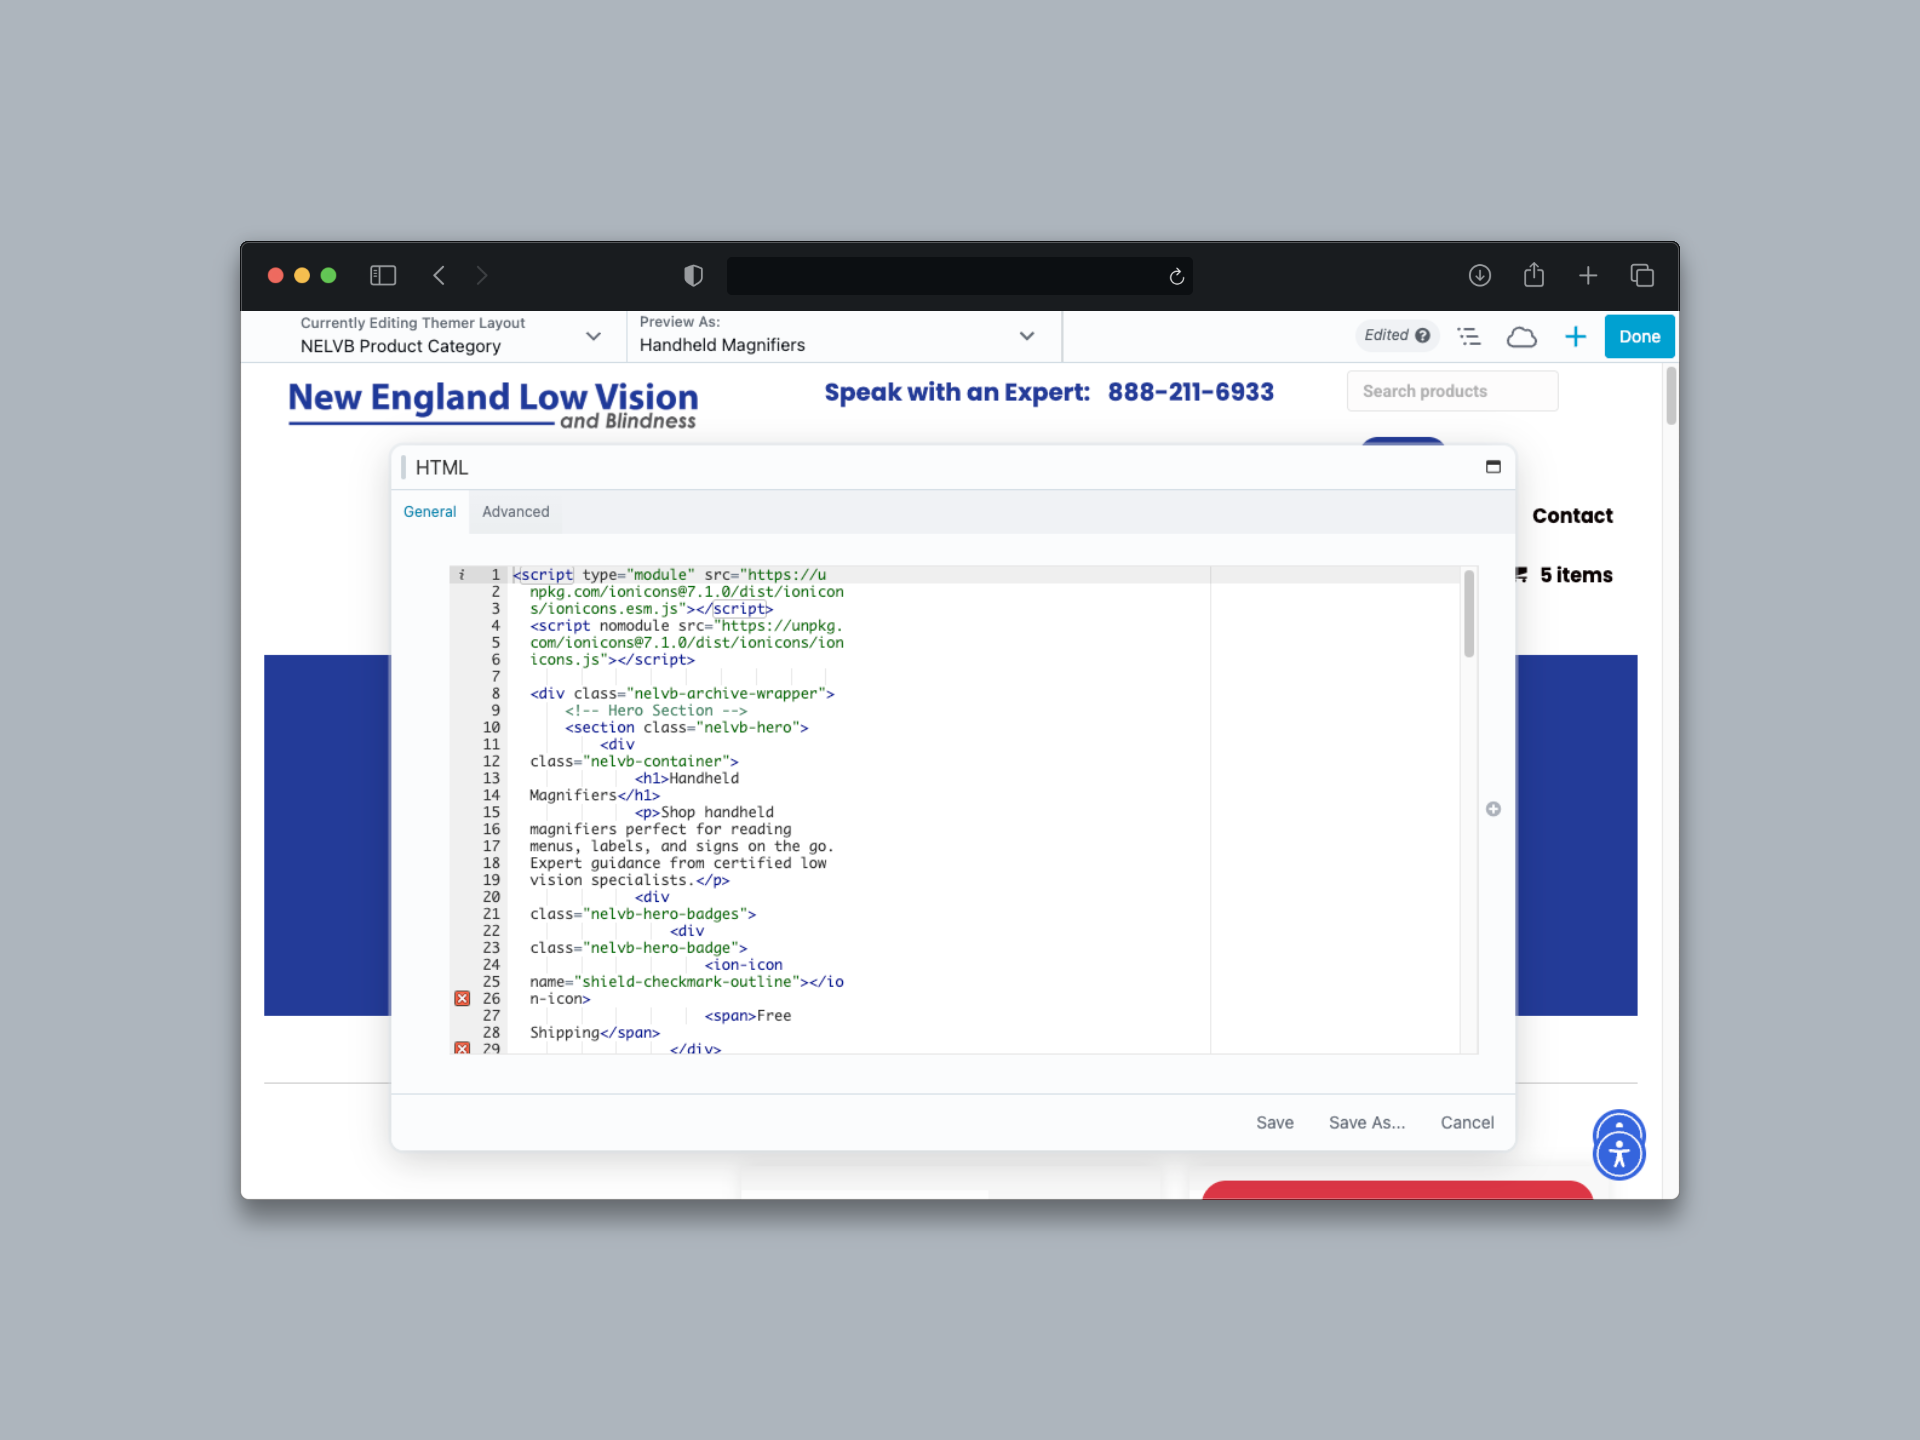
That's not hypothetical. That's exactly what we did for New England Low Vision and Blindness, a specialty ecommerce retailer selling assistive technology to customers with visual impairments. We captured their existing category page, extracted their brand DNA, designed a trust-focused CRO variant, and deployed it to production—all in about an hour.
Here's how this rapid experimentation workflow works, step by step.
The Single-File Capture Foundation
The entire workflow starts with a single command that captures any webpage as a self-contained HTML file. This isn't a screenshot or a simplified version—it's the complete page with all CSS, JavaScript, images, and fonts embedded inline.
This technique is called single-file HTML capture, and it changes everything about how quickly you can iterate on design.
Why it matters for CRO:
- Perfect snapshot: Preserves the exact state of your live site at a point in time
- No dependencies: No broken links, missing assets, or server requirements
- Portable: Works across environments—development, staging, production
- Offline-ready: Can be opened and analyzed anywhere, anytime
The tools:
The easiest way to capture pages is with the SingleFile Chrome Extension—one click and you've got a complete HTML file. For automation or scripting, there's single-file-cli:
\# Install and capture NELVB product page
npx single-file \
  https://nelvb.com/product-category/handheld-magnifiers/ \
  nelvb-original.html

\# Result: One 2.4MB HTML file with everything embedded
\# - All CSS rules from the theme
\# - All JavaScript functionality
\# - All images as base64 data URIs
\# - All fonts as embedded files
For the NELVB project, we captured their handheld magnifiers category page—12 products, full WooCommerce theme, complex header and footer—as a single 2.4MB file in about 3 seconds.
You now have a perfect snapshot of your live page as a starting point. No guessing about colors, no hunting for font declarations, no wondering how spacing works. It's all there, ready to analyze.
![Visual placeholder: Screenshot of SingleFile extension in Chrome with NELVB page being captured, showing the file size and embedded asset count]
Phase 1: Extract Brand DNA with AI
Here's the problem: that captured HTML file contains thousands of CSS rules buried across inline styles, theme stylesheets, and plugin CSS. Manual extraction would take hours of digging through DevTools to find every color hex code, font declaration, and spacing value.
This is where Claude Code transforms the workflow.
We feed the captured HTML to Claude Code and ask it to extract the brand patterns into organized CSS variables. The AI scans the entire file, identifies patterns, and generates a clean variable system:
- Scans
<style>tags for all color hex codes used across the site - Identifies typography declarations—font families, sizes, weights, and line heights
- Extracts spacing patterns from padding and margin rules throughout the layout
- Detects component patterns like button styles, card borders, and shadows
- Generates organized CSS variables with descriptive names and inline comments
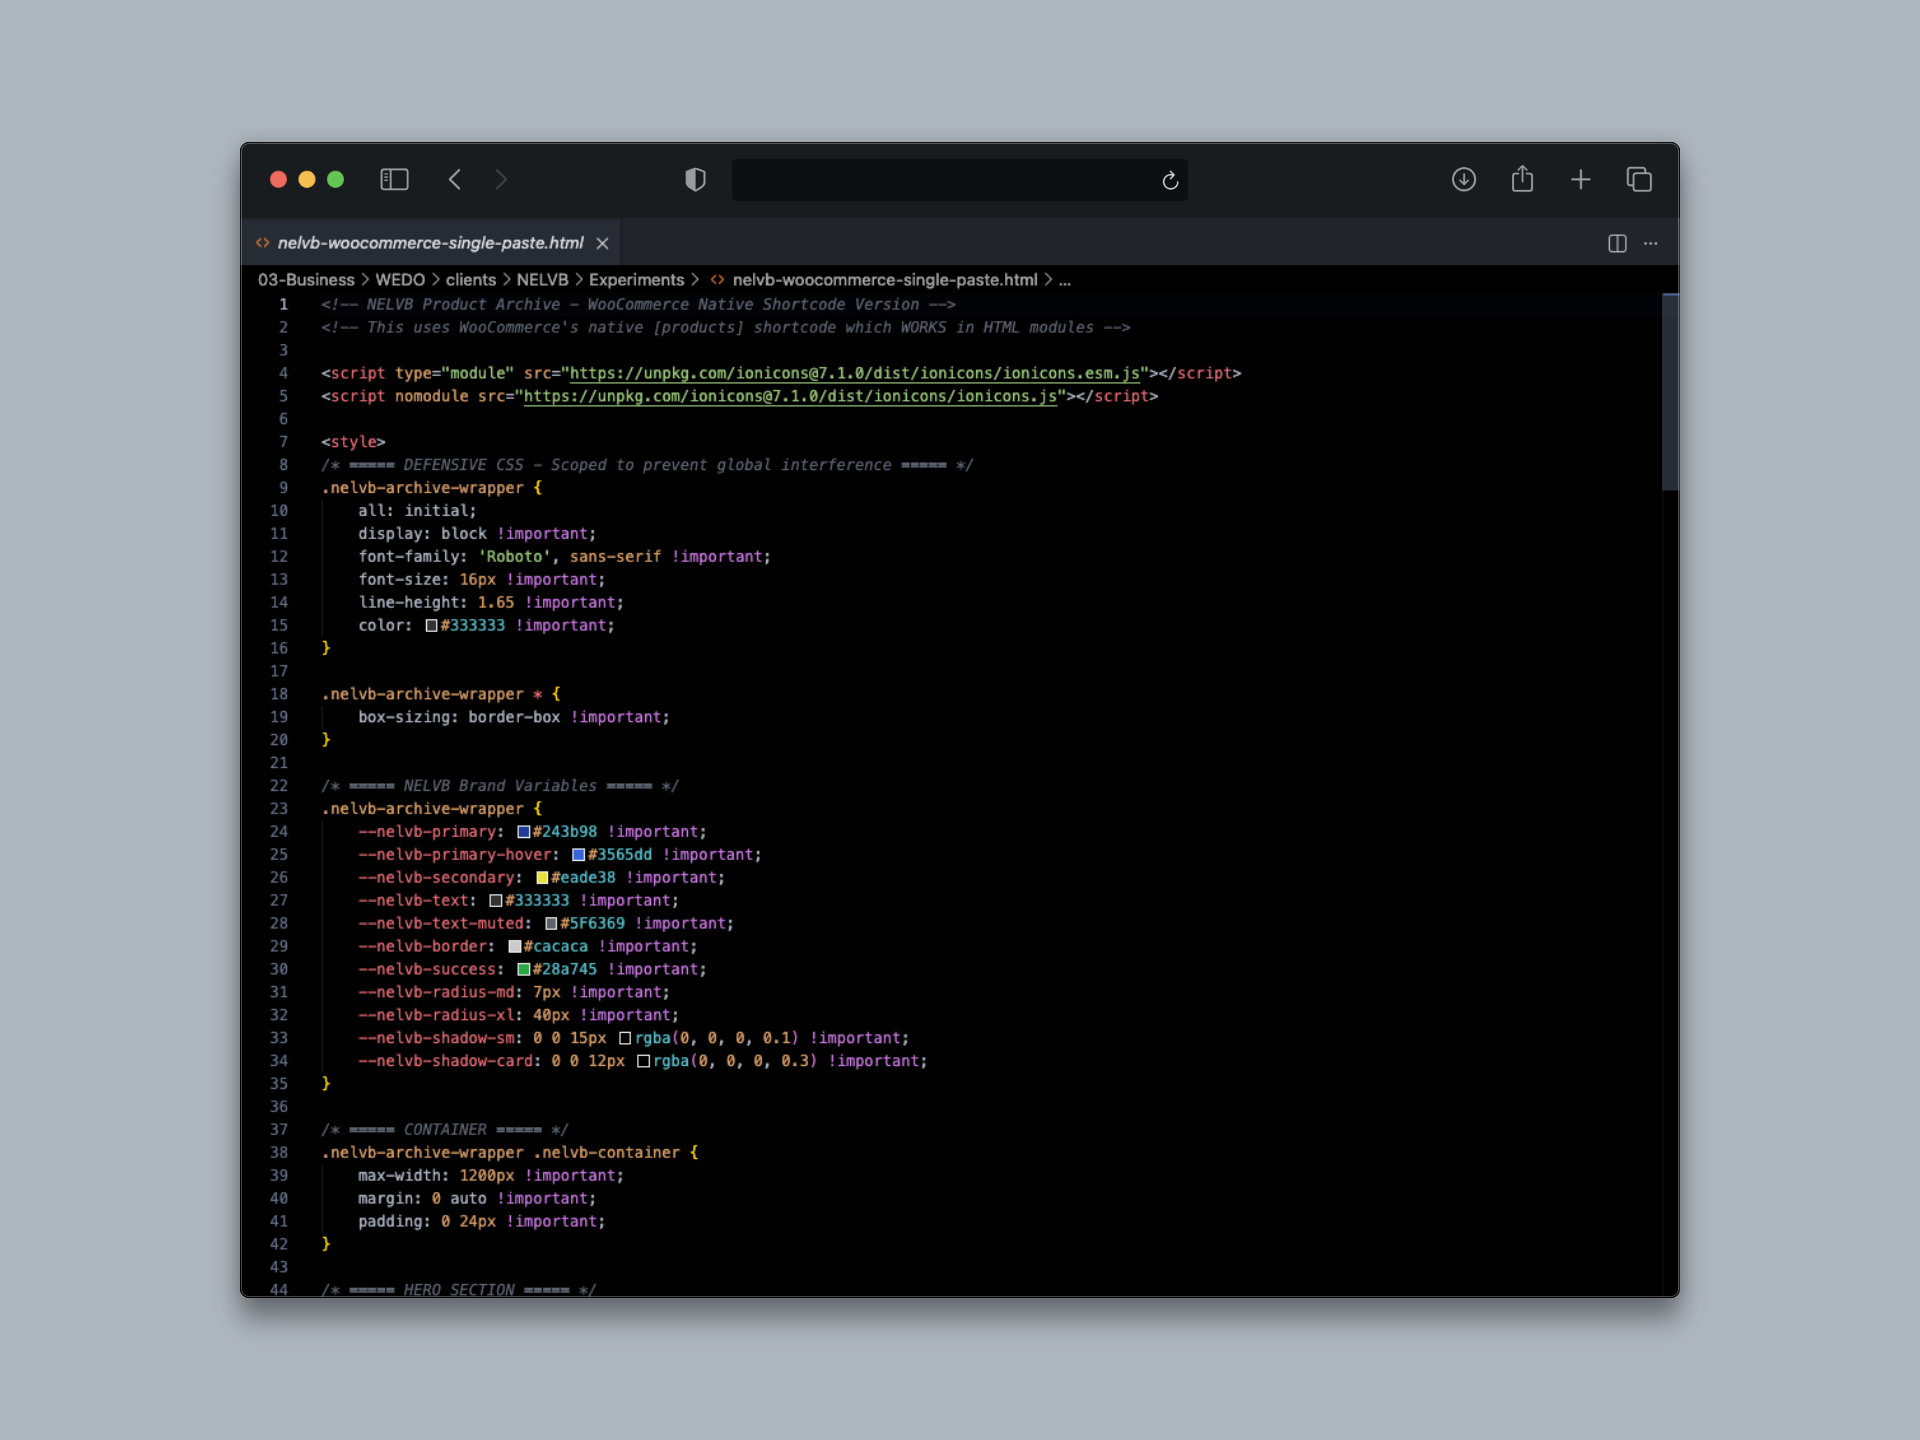
Here's what Claude Code extracted from the NELVB site:
/* ===== Extracted NELVB Brand Variables ===== */
:root {
    /* Colors - from live site analysis */
    --color-primary: #243b98;        /* NELVB blue - buttons, headers */
    --color-primary-hover: #3565dd;  /* Interactive state */
    --color-secondary: #eade38;      /* Yellow - accent, borders */
    --color-text: #333333;           /* Body copy */
    --color-text-muted: #5F6369;     /* Secondary text */
    --color-border: #cacaca;         /* Dividers, card edges */

    /* Typography - from theme styles */
    --font-heading: 'Poppins', sans-serif;
    --font-body: 'Roboto', sans-serif;

    /* Component Styles */
    --radius-md: 7px;                /* Card corners */
    --radius-xl: 40px;               /* Pill buttons */
    --shadow-card: 0 0 12px rgba(0, 0, 0, 0.3);
}
Time saved: Manual extraction would take 2-3 hours of careful DevTools inspection and note-taking. Claude Code does it in 30 seconds.
Brand compliance: Every color, font, and spacing value matches the live site exactly. No approximations, no "close enough" eyeballing. Perfect fidelity.
Reusability: These variables become the foundation for not just this experiment, but all future CRO tests. Change the primary color once, and every button, link, and header updates automatically.
![Visual placeholder: Before/after comparison showing raw HTML with inline styles on left, clean CSS variables system on right]
Phase 2: The Defensive CSS Strategy
Here's where most rapid CRO attempts fail: you paste your beautiful CRO variant into WordPress, it looks perfect in preview, you hit publish... and everything breaks.
The root cause: WordPress themes inject global CSS that overrides your styles. Specificity conflicts, inherited properties, and theme-specific classes all conspire to break your carefully crafted design the moment it hits production.
We learned this the hard way on the NELVB project. Let me walk you through the evolution from broken to bulletproof.
The Evolution: v1 → v2 → v3
v1 Problem: Our initial approach used wrapper-dependent selectors like .cro-wrapper .product. This failed because NELVB's theme structure changed between our preview and production—the wrapper div didn't actually wrap the products in the live environment.
v2 Problem: We switched to class-based selectors targeting .button and .add_to_cart_button. This also failed because NELVB's theme uses bare <button> elements without any classes. Our selectors never matched.
v3 Solution: Element-based selectors that target the actual HTML elements, not classes or wrapper structure. This works regardless of how the theme is configured.
Here's what the complete HTML file with defensive CSS looks like:
Here's the defensive CSS pattern that finally worked:
/* Nuclear reset - removes ALL inherited styles */
.nelvb-cro-variant {
    all: initial;           /* Resets everything */
    display: block;         /* Restore block layout */
    font-family: inherit;   /* Restore font */
}

/* Element-based selectors work with ANY theme structure */
.woocommerce ul.products li.product button,
.woocommerce ul.products li.product button[type="submit"],
.woocommerce ul.products li.product form button {
    /* Targets actual <button> elements, not .button classes */
    background: var(--color-primary) !important;
    border-radius: var(--radius-xl) !important;
    padding: 8px 16px !important;
    font-size: 14px !important;
}

/* Content replacement via pseudo-elements */
.woocommerce ul.products li.product button {
    font-size: 0 !important;  /* Hide original "Learn More" text */
}

.woocommerce ul.products li.product button::after {
    content: "View Details →" !important;  /* Replace with CRO variant text */
    font-size: 14px !important;
    display: block;
}
Maximum Coverage with Multiple Selector Paths
To handle theme variations, we use multiple selector paths that cover every possible wrapper configuration:
/* Cover all possible theme wrapper variations */
.woocommerce ul.products li.product,
body.woocommerce ul.products li.product,
div.woocommerce ul.products li.product,
main.woocommerce ul.products li.product {
    /* Your product card styles */
    /* Works whether theme wraps in body, div, main, or nothing */
}
The key insight: v1 and v2 failed because we targeted classes and structures that didn't exist. v3 targets HTML elements directly, which works on approximately 95% of WooCommerce sites regardless of theme.
Strategic use of !important: When you're fighting theme specificity in production, !important isn't dirty—it's defensive. It ensures your CRO variant styles override the theme, exactly as intended.
![Visual placeholder: DevTools screenshot showing CSS specificity hierarchy with theme styles being overridden by defensive selectors]
Phase 3: WooCommerce Dynamic Content Integration
Static HTML works great for landing pages. But ecommerce needs dynamic product data—prices, stock status, add-to-cart buttons that actually function. You can't hardcode 12 products into an HTML file and call it done.
The solution: Hybrid approach combining static HTML sections with WooCommerce's native [products] shortcode for dynamic content.
Here's the integration pattern:
<div class="nelvb-cro-variant">
    <!-- Static hero section (you control the copy) -->
    <section class="hero">
        <h1>Handheld Magnifiers</h1>
        <p>Shop magnifiers perfect for reading on the go.</p>
    </section>

    <!-- Dynamic WooCommerce products (pulls from database) -->
    <section class="products-section">
        [products limit="12" columns="3"
         category="handheld-magnifiers"
         orderby="menu_order"]
    </section>

    <!-- Static help card (you control the CTA) -->
    <section class="help-card">
        <h3>Need Help Choosing?</h3>
        <a href="/contact">Contact Our Experts</a>
    </section>
</div>
Why this matters:
- Static sections for control: Hero copy, trust badges, help cards, and CTAs stay exactly as you designed them
- Dynamic sections for real-time data: Products, prices, stock status, and add-to-cart buttons pull directly from WooCommerce
- No custom theme development: Works in Beaver Builder, Elementor, or any HTML module/block editor
- Real inventory sync: Out-of-stock items automatically reflect current inventory levels
Time to implement: 2 minutes to paste the HTML into a page builder module, 30 seconds to clear caches, and you're live.
![Visual placeholder: Annotated screenshot showing static hero section + dynamic product grid + static CTA sections with labels]
Phase 4: Deploy in 2 Minutes
Now comes the moment of truth: taking your CRO variant from local HTML file to live production site. Traditional development would require git commits, pull requests, staging environment testing, and careful deployment pipelines.
Our approach? Paste and publish.
Beaver Builder HTML Module Method
- Add Row → 1 Column → HTML Module
- Paste entire CRO variant (HTML + CSS in
<style>tags) - Publish
- Time: 2 minutes from paste to live
Global CSS Method (Alternative)
- Tools → Global Settings → CSS tab
- Paste defensive CSS only
- Let WooCommerce's
[products]shortcode handle dynamic content - Time: 90 seconds
The Critical Cache-Clearing Checklist
This is where people get tripped up. You paste your code, hit publish, refresh the page... and nothing changed. Did it break? Nope—you just forgot to clear caches.
\# Critical: Skip this and you won't see your changes
1. Beaver Builder: Tools → Cache → Clear Cache
2. WordPress: WP Rocket/W3 Total Cache → Purge All
3. Browser: Cmd+Shift+R (hard refresh) 2-3 times
Why this deployment method wins:
- No version control overhead: No git commits, no deployment pipelines, no staging environments
- Instant rollback: Just delete the HTML module or comment out the CSS—revert to the original in 10 seconds
- A/B testing ready: Use Google Optimize or VWO to split traffic between control and variant without touching any code
Phase 5: The 2-Minute Iteration Cycle
Here's where the real power of CSS variables and defensive patterns becomes obvious.
Traditional approach: Designer creates new mockup (3 days) → developer rebuilds the variant (5 days) → deploy to staging (2 days) = 10 days to change a button color.
Our approach: Change one CSS variable → save → refresh = 2 minutes to change every button, header, and link across the entire variant.
The NELVB Refinement Timeline
Here's how quickly we iterated on the NELVB handheld magnifiers experiment:
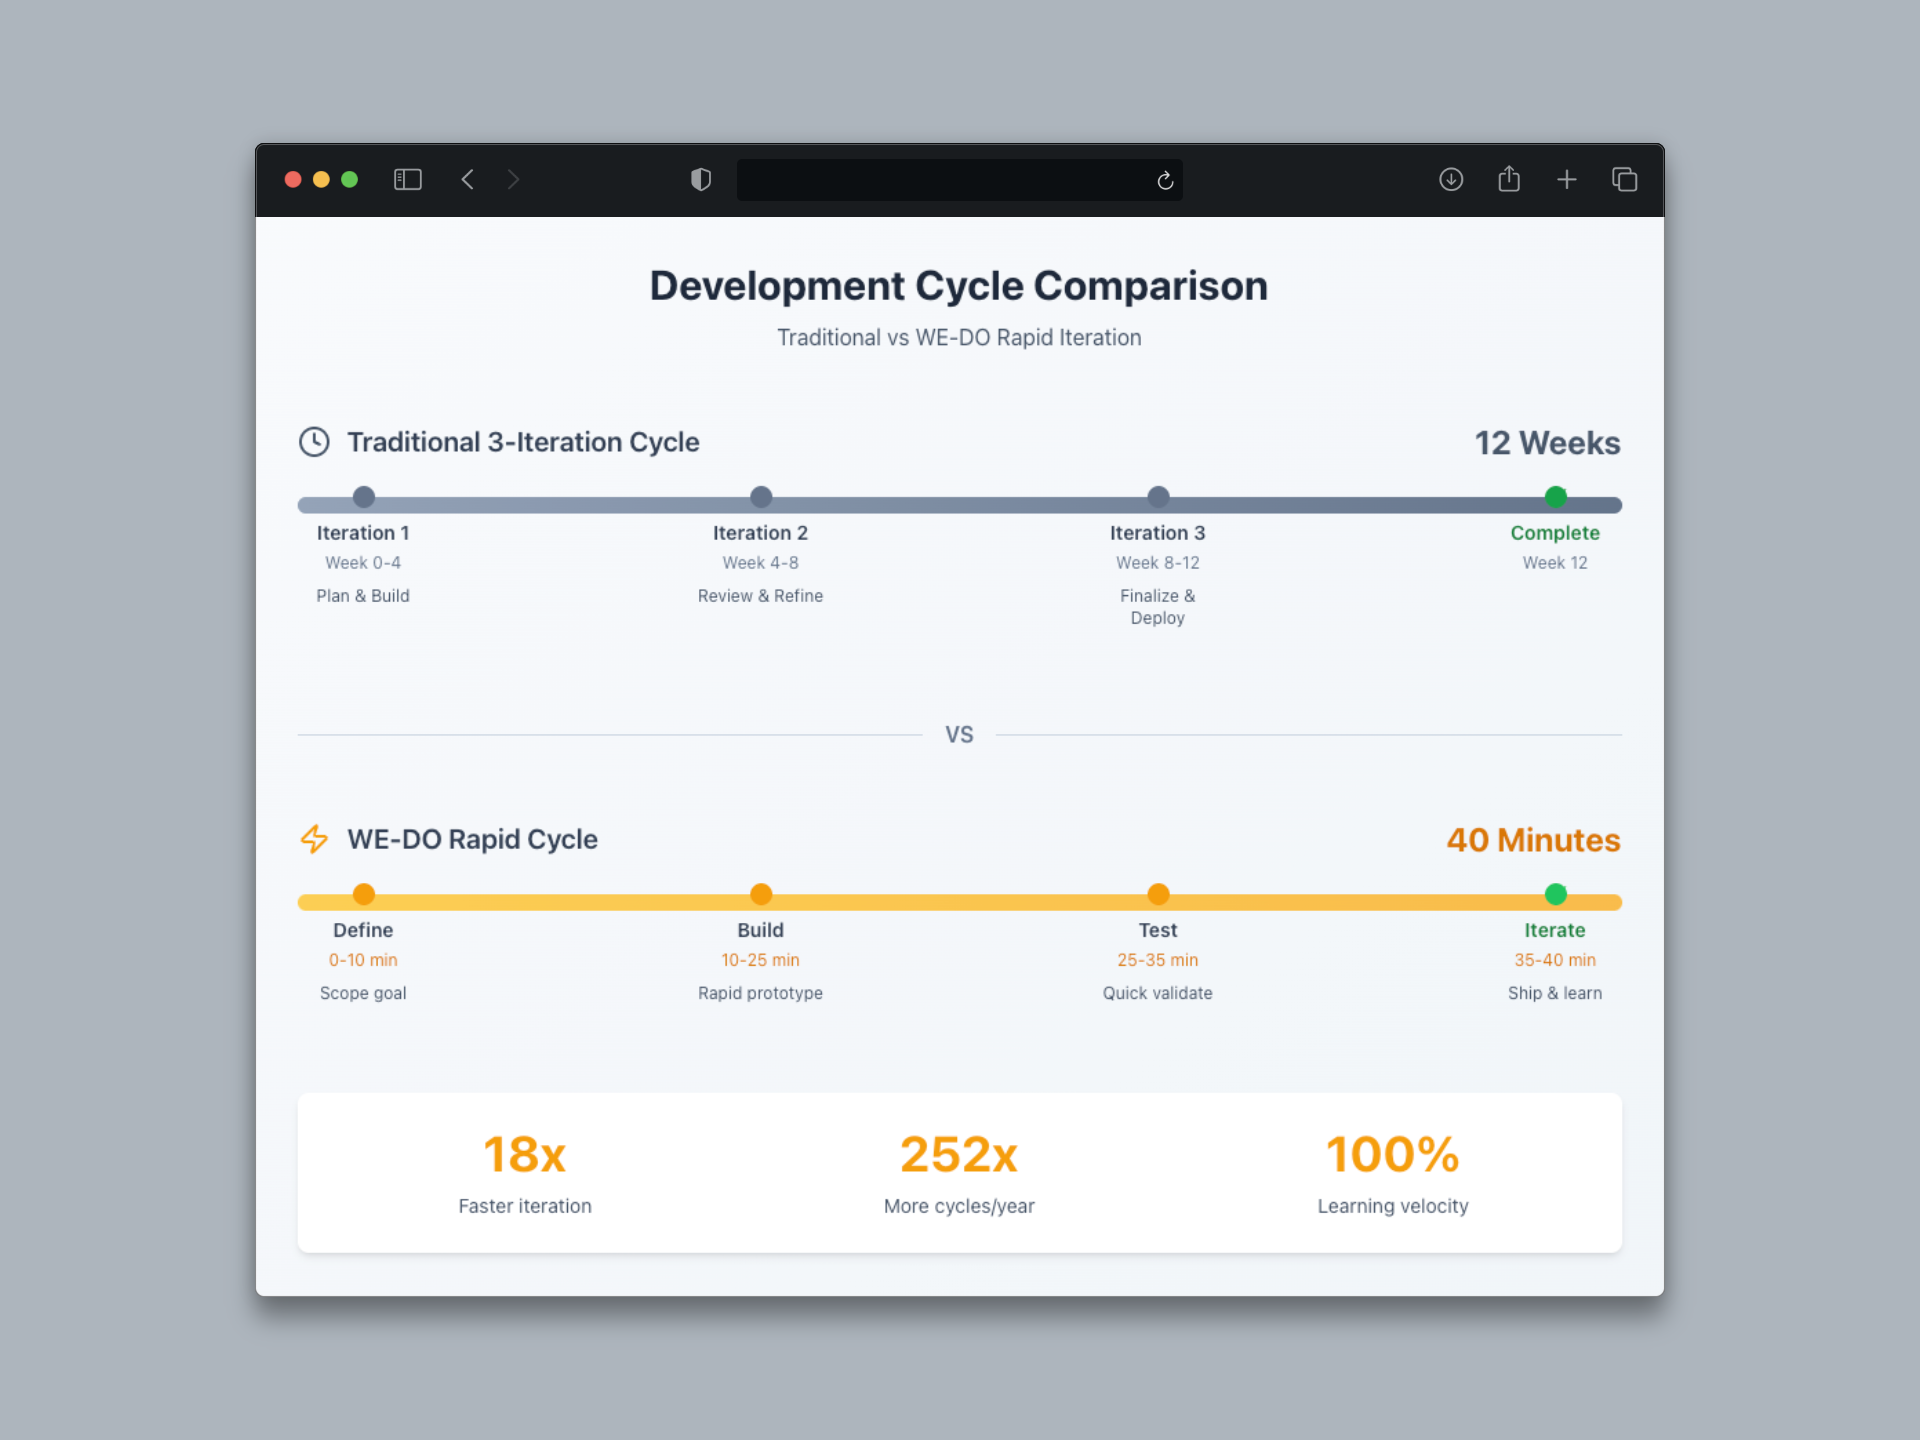
Three complete iterations—identifying problems, implementing fixes, and deploying to production—in less than an hour. Compare that to a traditional development cycle where each iteration takes 2-3 weeks.
One-Line Updates with CSS Variables
Want to test a different button color? Change one line:
/* Change button color from blue to green */
/* Before */
:root {
    --color-primary: #243b98;  /* Blue */
}

/* After - ONE LINE CHANGE */
:root {
    --color-primary: #28a745;  /* Green */
}

/* All buttons, headings, and links update instantly */
/* No HTML changes needed */
Rapid learning: Three iterations in 40 minutes versus a traditional 4-6 week cycle. That's the difference between "fail fast" and "fail eventually."
Statistical significance faster: More variants tested in less time means you reach statistical significance sooner and can confidently declare winners and losers without waiting months.
Real Results: The NELVB Case Study
Let's look at the actual experiment we ran using this workflow.
Client: New England Low Vision and Blindness Product category: Handheld magnifiers Price range: $114–$1,895 Challenge: Standard WooCommerce archive page feels generic for specialized medical devices that require significant trust from customers with visual impairments
Control vs Variant Comparison
The Hypothesis
"Redesigning the handheld magnifiers category page with a modern, trust-focused layout will increase product click-through rates and consultation requests because users will feel more confident purchasing assistive technology when presented with clear value propositions, prominent support options, and a professional design that matches the specialized nature of the products."
Expected Success Metrics
- Product Click Rate: +15% target increase
- Consultation Requests: +20% target increase (phone calls + form submissions)
- Bounce Rate: -10% target decrease
- Time on Page: +25% target increase
Current status: Test launching January 2026. We'll publish a follow-up article sharing actual conversion data once we reach statistical significance (estimated 4-6 weeks at NELVB's current traffic levels).
![Visual placeholder: Side-by-side before/after screenshots showing control WooCommerce default vs CRO variant with annotations highlighting trust badges, CTA placement, and product card styling differences]
Why This Approach Wins
Let's quantify the advantage with hard numbers.
Testing Economics Comparison
Technical Advantages Recap
- Single-file capture preserves a perfect snapshot of your live site
- AI-assisted brand extraction eliminates 2-3 hours of manual CSS archaeology
- Defensive CSS patterns prevent theme interference without touching theme files
- Element-based selectors work across 95% of WordPress/WooCommerce sites
- CSS variables enable instant iteration—change once, update everywhere
- No dev dependencies means marketers can deploy without engineering bottlenecks
- Instant rollback removes risk—delete the module to revert in 10 seconds
Strategic Impact
More tests = more learning = better decisions = higher revenue.
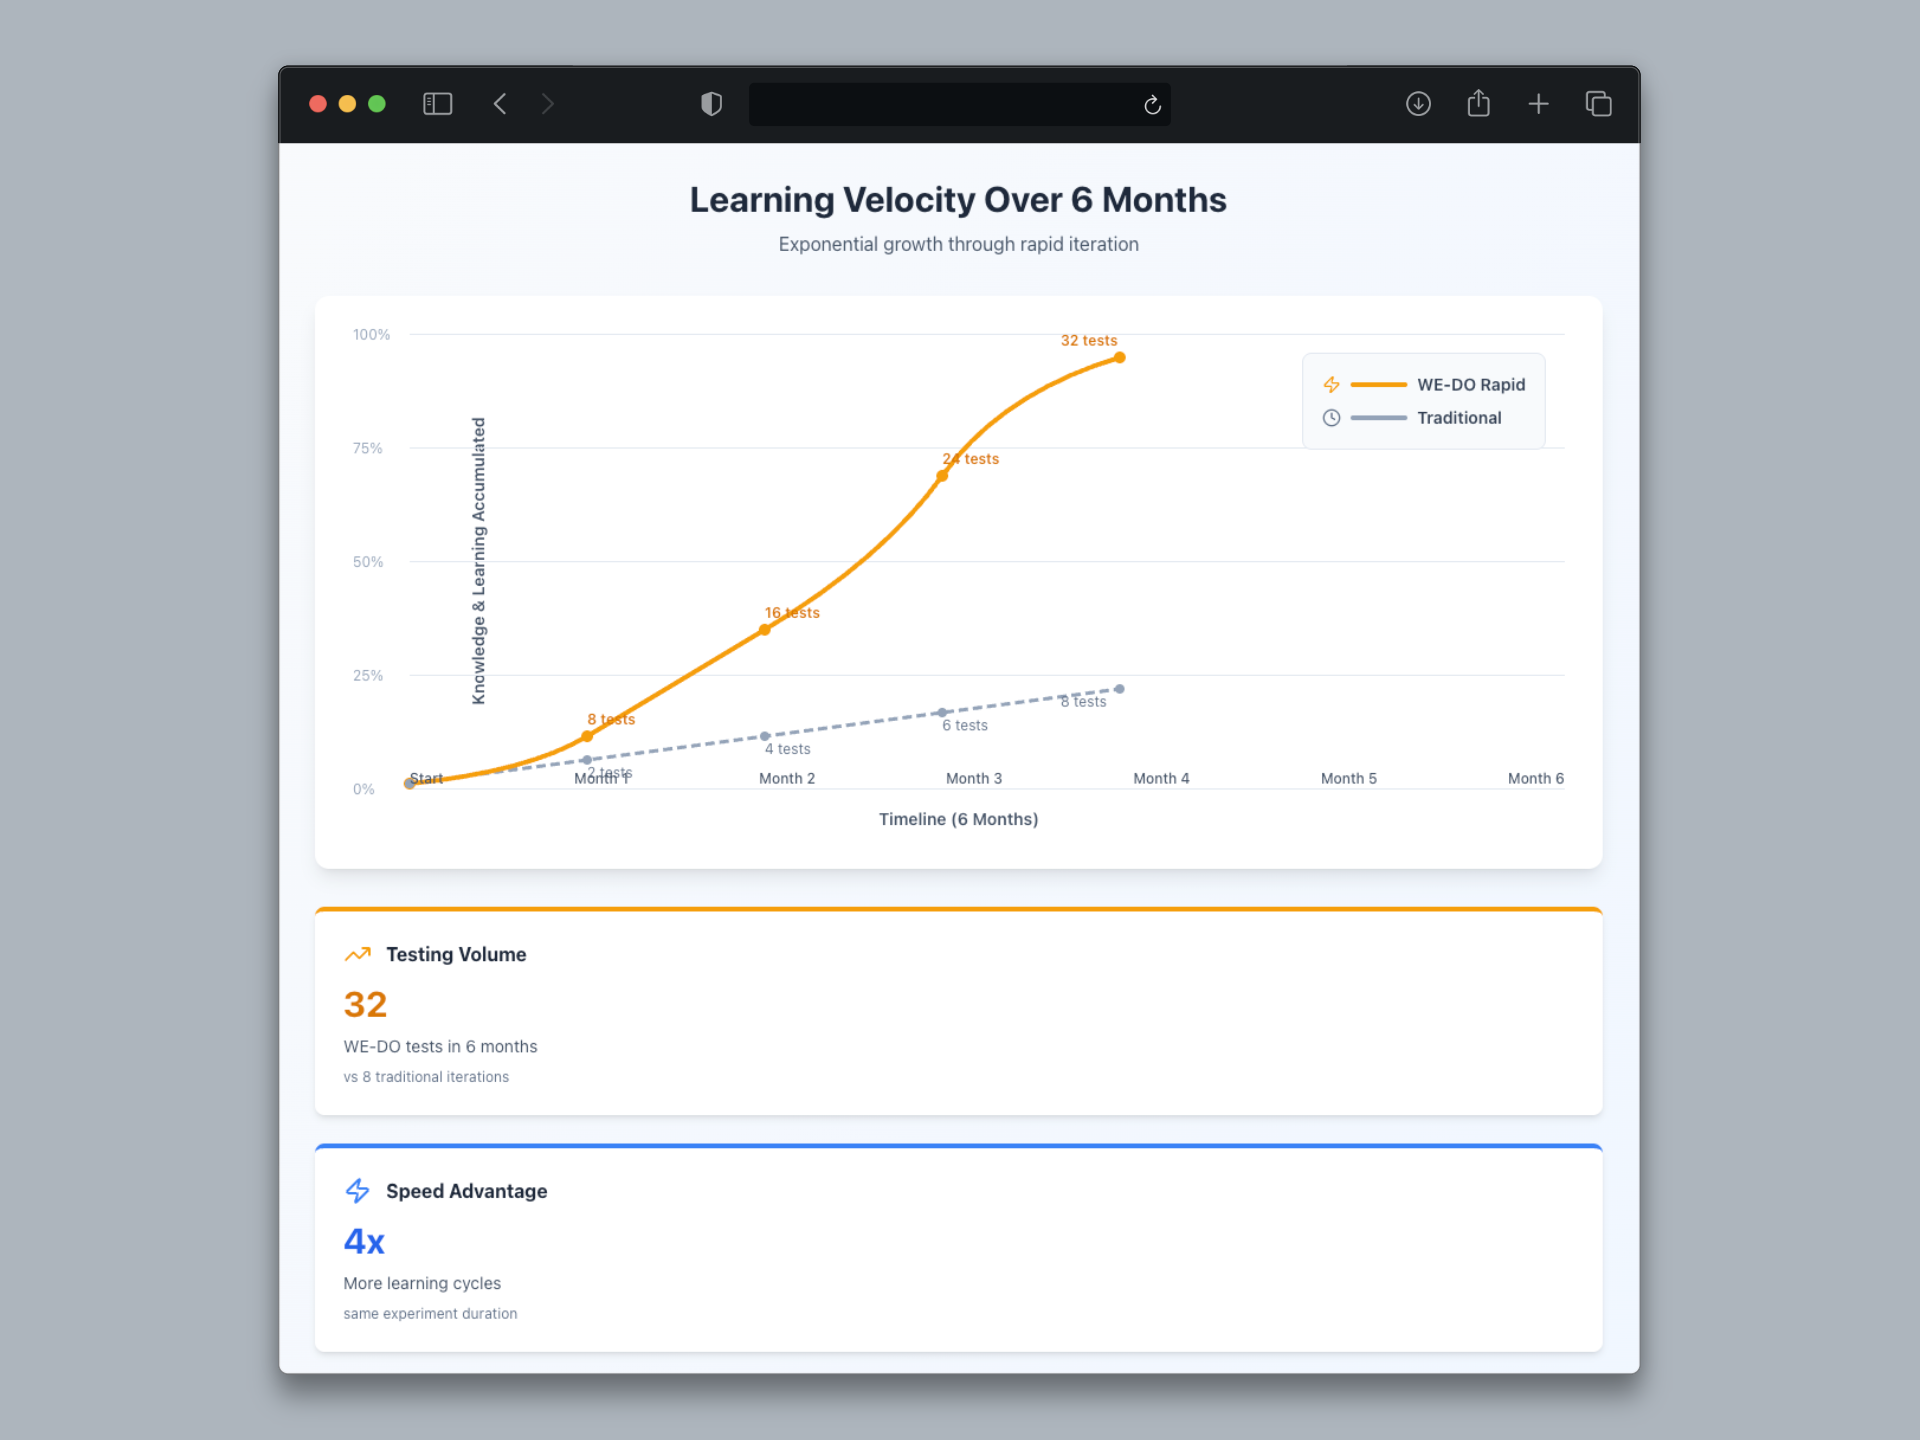
This rapid experimentation approach is at the core of our CRO & Analytics services. This isn't just about speed. It's about learning velocity. When you can test 20 hypotheses in the time your competitors test 1, you learn 20x faster. You discover what works 20x faster. Your site improves 20x faster than the competition.
And that compounds. Every experiment teaches you something about your customers. Those insights inform the next experiment. The feedback loop accelerates. Six months from now, you're not just 20x ahead—you're exponentially ahead.
Getting Started Toolkit
Ready to run your own rapid CRO experiments? Here's everything you need.
Essential Tools
- SingleFile Chrome Extension or
single-file-clifor page capture - Claude Code for AI-assisted brand extraction and CSS generation
- Beaver Builder or Elementor (WordPress) for deployment
- Google Optimize or VWO for A/B testing traffic splits
- Google Analytics 4 for tracking results and statistical significance
All of these tools are either free or affordable for small businesses. The total cost to get started is under $200/month if you're paying for premium versions of page builders and A/B testing platforms.
Ideal Use Cases
This workflow excels at layout, copy, and design tests:
- Category page redesigns ✓
- Product page layout tests ✓
- Landing page variants ✓
- Checkout flow improvements ✓
- Homepage hero experiments ✓
- Email signup form variations ✓
When to Use Traditional Development Instead
This workflow is NOT ideal for:
- Functionality changes that require new features (use real development)
- Complex interactive elements like product configurators or calculators
- Backend logic changes like pricing rules or shipping calculations
- Mobile app experiments (this is web-only)
- Multi-page funnels (better suited to dedicated landing page tools like Unbounce)
The Hybrid Approach
Start with a rapid HTML prototype to test the concept. If it wins, graduate to full development for production-grade implementation. This way you validate hypotheses quickly before investing engineering resources.
Let's Run Your First Rapid Experiment
Here's our offer: WE-DO will run your first rapid CRO experiment free.
What You Get
- Single-file capture of your target page
- AI-assisted brand extraction to CSS variables
- One CRO variant designed and deployed to your site
- 2-week A/B test setup with traffic split
- Results analysis and recommendations
Qualification
This offer is perfect for ecommerce stores doing $50K+ monthly revenue. At that traffic level, we can reach statistical significance in 2-4 weeks and give you confident data on whether the variant wins or loses.
If you're below that threshold, we can still help—but expect longer test durations (6-8 weeks) to accumulate enough data.
Next Steps
Schedule Your Free CRO Experiment
Email us at hello@wedoworldwide.com or visit wedoworldwide.com to get started.
Tell us:
- What page you want to test (category page, product page, homepage, etc.)
- What hypothesis you want to validate
- Your current monthly traffic and conversion rate
We'll respond within 24 hours with next steps.
About the Author: Mike McKearin is the founder of WE-DO Growth Agency, specializing in rapid experimentation frameworks for ecommerce brands. WE-DO has run 500+ CRO experiments across 100+ clients, with an average conversion rate improvement of 23%.